Checkerboard Quilt
One of our local libraries is designed to be more of a "hang out" than a place for books. Besides the big screen TV, the toys and the cushions, they also have an oversize checkerboard game laid out on one of the tables in the children's area. The last couple times I have taken my children there, they have preferred to play to checkers then browse the (somewhat scanty) collection of books.
Wednesday evening, Steven saw me trying to close the lid on my bucket of fabric scraps leftover from various quilting and sewing projects, and he mentioned that I should use them up. Hmmmm. What could I make? I didn't really want to do another big quilt since I never completed the last one I made three years ago. (See here to see where it was then. The situation hasn't changed.) I don't have enough of these to make articles of clothing. But I remembered the checkerboard from the library. Maybe I could make something like that.
Anyway, I took pictures along the way so I could blog about the process of making it. Here's what I did:
I figured I wanted each square to be about 3" by 3". That would make the total board about 2' square. That sounded pretty close to the size of the one at the library. I cut four strips of light colored fabric 3 1/2" x 28" (3" + 1/2" for 1/4" seams, by the same times 8 because the checkerboard would have 8 rows.). Then I cut four strips of dark colored fabric, the same size.
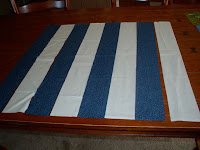

Next, I sewed a 1/4" seam along the long edges of each light colored strip to a dark strip, then sewed those strips together so they alternated light-dark-light-dark. My total rectangle was about 24 1/2" x 28".

 When they were all attached, I ironed the seams all in one direction.
 Next I cut 3 1/2" strips across, so each strip had a dark square, a light square, a dark square, etc. I laid these out on the table side by side, then turned every other strip around so I had a checkerboard pattern laid out on the table.

 I took two of these strips, making sure that each light square was touching a dark square, pinned together all the seams so they would match, then carefully sewed the strips together. I continued this process until all the strips were sewn together

 I then ironed the seams in one direction again.
At this point, I had a square that was pretty close to 24" square. I decided that I wanted a thin (1/2") border around the edge, so I cut four strips of dark fabric 1"x 26"
I sewed two of these thin strips to opposite sides, cutting off the excess, then sewed the remaining strips to the two other sides, forming a border around the entire checkerboard.

 I then cut another piece of fabric for my back in a square about 25"x25". I actually used my checkerboard to determine the actual size I would need, cutting the back to the same dimensions. I also cut a piece of quilt batting to that same size.
Next, I layered the pieces, with the batting on the bottom, the quilt bottom facing up, and the checkerboard top facing down, matching sides and corners, pinning them together so they wouldn't slide around.
 I sewed around the edges, through all three layers, leaving one section (about 6" long) open.
 When the layers were sewn together, I trimmed the corners, then turned the quilt right side out so the checkerboard and bottom were showing and the batting was on the inside. I payed particular attention to poking the corners out.
 Then I ironed the quilt, especially around the edges, so they would lay flat and neat.
 I switched my thread to something that wouldn't show much against my fabrics, and stitched "in the ditch" or on top of the seams, around the border and between the squares of the checkerboard to hold everything in place. I also stitched right along the outer edge to close up the opening where I had turned the quilt.
 And it was done! When my children came home, at least two of them played checkers on it, using Connect 4 pieces. I'll have to figure out some bigger checkers to fit the size of the board.

Wednesday evening, Steven saw me trying to close the lid on my bucket of fabric scraps leftover from various quilting and sewing projects, and he mentioned that I should use them up. Hmmmm. What could I make? I didn't really want to do another big quilt since I never completed the last one I made three years ago. (See here to see where it was then. The situation hasn't changed.) I don't have enough of these to make articles of clothing. But I remembered the checkerboard from the library. Maybe I could make something like that.
Anyway, I took pictures along the way so I could blog about the process of making it. Here's what I did:
I figured I wanted each square to be about 3" by 3". That would make the total board about 2' square. That sounded pretty close to the size of the one at the library. I cut four strips of light colored fabric 3 1/2" x 28" (3" + 1/2" for 1/4" seams, by the same times 8 because the checkerboard would have 8 rows.). Then I cut four strips of dark colored fabric, the same size.


Next, I sewed a 1/4" seam along the long edges of each light colored strip to a dark strip, then sewed those strips together so they alternated light-dark-light-dark. My total rectangle was about 24 1/2" x 28".


At this point, I had a square that was pretty close to 24" square. I decided that I wanted a thin (1/2") border around the edge, so I cut four strips of dark fabric 1"x 26"
I sewed two of these thin strips to opposite sides, cutting off the excess, then sewed the remaining strips to the two other sides, forming a border around the entire checkerboard.


Next, I layered the pieces, with the batting on the bottom, the quilt bottom facing up, and the checkerboard top facing down, matching sides and corners, pinning them together so they wouldn't slide around.


Comments
Post a Comment